1 Sept 2015

OpenCV 3.0 in NetBeans IDE 8.0.3 configuration (MinGW + Windows 7)

This post is about my personal experience with installing, configuring and running OpenCV 3.0 in NetBeans IDE 8.0.2 with MinGW compiler on Windows 7. I do not say that this is the best possible approach, but I have learnt from some my mistakes, so someone could find this tutorial useful.

Prerequisites for this task

  • Install the MinGW compiler for 32-bit compilation, my install path is C:\Code\mingw\
  • Install MSYS, my path is C:\Code\msys\1.0\
  • Install CMake, my install path is C:\Code\CMake\
  • Install and configure NetBeans IDE with C++ plugin, link with C:\Code\mingw\bin
  • Include CMake bin folder in C:\Code\CMake\bin in Path environment variable
  • Include MinGW compiler bin folder in C:\Code\mingw\bin in Path environment variable
You should be able to compile and run simple Hello World! example. (To minimize possible initial error, that is not relevant to OpenCV configuration.). Create new project:


I have named my project MyOpenCVtest. I use GNU MinGW.


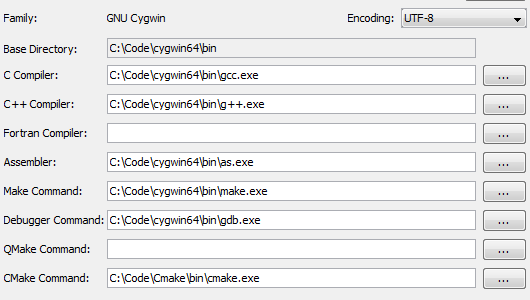
In NetBeans IDE menu, the Tools/Options/C/C++ show the compiler configuration, it should be set like this.


The simple Hello World! program can be written with iostream library and you should have no problem to compile it an run with no additional steps.


Now you can close NetBeans and you are ready to setup the OpenCV 3.0. To verify that your Environment Variable Path contains the C:\Code\CMake\bin, and C:\Code\mingw\bin, that are required for next steps, run the command prompt and type path. The output should contain it. If not, Right-click on the Computer and select the Properties option. Than select Advanced System Settings, in Advanced click on the Environment Variables and find Path. Append the

C:\Code\CMake\bin;C:\Code\mingw\bin;

at the end of the textbox with no blank spaces and do not delete anything. Test again with command prompt. Now, you are ready to download  the OpenCV.

Note: If you have problems with MinGW, install also Cygwin.

Prepare the files

The first step is to download the OpenCV for Windows. Go to official site official site and click on link to start download.


Extract the files into working directory, in my case it is C:\Code\opencv. After extraction there will be two folders, the build folder and the source folder. I was trying to locate the mingw folder which should contain the files for MinGW compilator, inside it, but it is not there. After some googling, I found that I need to compile it myself using CMake. To do so, locate the cmake-gui.exe in the CMake bin folder, in my case it is C:\Code\CMake\bin. Run the application.

I have set field Where is the source code:  to C:/Code/opencv/sources. You can use the Browse button. This is where the source files are located. Just under that, the field Where to build binaries: should lead to your custom folder, where you want the output. I chosen the path build folder, to C:/Code/opencv/build/x86/mingw, but you can specify any folder. (Prefer folder with path that doesn't contain space characters). Also, you can check Grouped and for better orientation in lists.


After that, I have clicked the Configure button below. Since in my case the mingw folder does not exist, the CMake asks to create it by window.


After that you are prompted to specify generator for this project. Since I am using MinGW, the option  MinGW Makefiles is obvious. Click Finish button to complete.


If everything is OK, the CMake now start to configure - it takes a few moments. In the log on the bottom of the window you may see some red warning messages, but it does not mean that there is a problem. After the configuration run is complete, the window should look like this:


Now click on the Generate button. The process should take only a few moments. The red colored list is now white.


Now you can close the CMake and head to working folder, in my case it is C:/Code/opencv/build/x86/mingw. Run the command prompt (the simple way is Hold Shift + right mouse click in folder) and run the

mingw32-make

command in it. If it throws the unrecognized command error, you probably have an error in the C:\Code\mingw\bin in PATH system variable. The output should look like this:


During this process, I have encountered two errors that stopped build. The first was at 26% - I have encountered this error:


I browsed and found the solution that I need to uncheck the WITH_IPP option in CMake list. After that I pressed the Configure and Generate buttons. 


After that I have started the command prompt again and run the

mingw32-make

command in it. Build was restarted, but it reached 26% really fast, ant than slowly continued. Unfortunately, at 37%, I have encountered second error:


I found solution, that I need to comment (#) the line 67 in file OpenCVCompilerOptions.cmake  located in C:\Code\opencv\sources\cmake.

# add_extra_compiler_option(-Werror=non-virtual-dtor)

After that I have started the command prompt again and run the

mingw32-make

command in it. The configuration and generation occurred and the build process restarted from zero, but it reached 100% without additional input. Finally, the result looks like this:

When finished, I have started the command prompt and run the

mingw32-make install

command in it. This created the C:\Code\opencv\build\x86\mingw\install folder with include and x86 folders. Copy the folders opencv and opencv2 from include folder to MinGW include folder, in my case to C:\Code\mingw\include. (approx. 3MB). Than open the lib folder, in my case C:\Code\opencv\build\x86\mingw\install\x86\mingw\lib, and copy all .a files (18 files) to MinGW lib folder, in my case to C:\Code\mingw\libNow it should be prepared to use OpenCV in NetBeans.


Test OpenCV in NetBeans IDE 8.0.2

Run the NetBeans and open the Hello World project. Write simple code to get OpenCV version:

Without any settings to project properties, the result should be "OpenCV Version: 3.0.0." in Debug and Release mode. Now we try to test webcam, copy the code


This code access the default webcam in your computer, opens the window and show frames. To stop the application, press any key. When you try to compile, you get errors like undefined reference to cv::VideoCapture::VideoCapture(int). You need to add the OpenCV libraries to Linker. Right click on the Project (in my case MyOpenCVtest) node and select Properties option. Set  Configuration to <All Configurations>, so changes will apply both on debug and release settings. In the tree-view on the left, open Build node, select Linker and find Libraries section on left. Click on the ... button and use Add Library File ... button. In the MinGW lib folder, in my case the C:\Code\mingw\lib, select all libopencv_ libraries. You should end up with this:


Click OK button twice and you should be able to compile the webcam test code with no errors. The application cannot run, you need to copy the 17 .dll files from x86\mingw\bin in install folder that you created, in my case from C:\Code\opencv\build\x86\mingw\install\x86\mingw\bin to project output folder, where is the myopencvtest.exe, in my case to MyOpenCVtest\dist\Debug\MinGW-Windows and MyOpenCVtest\dist\Release\MinGW-Windows. Now you can run the application, through the NetBeans or standalone. 

23 Aug 2015

SDL2 - 2.0.3 in NetBeans IDE 8.0.2 configuration tutorial (MinGW/MinGW-W64 + Windows 7)

This post is about my personal experience while configuring the SDL2 (Simple DirectMedia Layer) to compile with MinGW compilers and use in NetBeans IDE 8.0.2 on Windows 7. As a newbie to SDL and NetBeans, I encountered a lot of errors, found solutions and I want to share my gained experience with you. I hope that this tutorial in my post will give some help to someone in need.


Prerequisites for this task

  • Install the MinGW compiler for 32-bit, my install path is C:\Code\mingw\
  • Install the MinGW-W64 compiler for 64-bit, my install path is C:\Code\mingw64\
  • Install the MSYS, my path is C:\Code\msys\1.0
  • Install the CMake, my path is C:\Code\CMake
  • Install the NetBeans IDE 8.0.2 with C/C++ plugin
You should be able to compile and run simple Hello World! example. (To minimize possible initial error, that is not relevant to OpenCV configuration.).


Open the NetBeans IDE and in menu click on Tools/Options. In the C/C++ tab, I have 3 tool collections - Cygwin,


MinGW-W64 


and MinGW, which is set as default.


To add new tool collection and set it correctly, click on button Add, find the bin directory in compilers installation directory and set tool collection like this


I do not say that this is the best setup, but it works in my case.

Note: It is recommended to install MinGW to path without the blank spaces


Hello world project

If everything set, you can now create a new project, in which you will test if the SDL2 is working.


Name the project, in my case it is SDL2project, select save location and MinGW compiler.


Open the main.cpp file and write code for Hello World.


Right-click on project node and select Properties. If you want to apply changes on debug and release at once, set Configuration: to <All configurations>. In Run node selected, set the Console Type to Standard Output. Or, if you want independent console window, set External terminal. This step is not necessary, but I think that this setting is better than Internal Terminal, which is set to default.


In the Build node, select the C++ Compiler and set the Architecture to 32 Bits.


From now on, the applications build under Debug and Release will be 32 bit. Apply the changes. Now we will create the Debug64 and Release64, that will be used for 64 bit applications. In project properties, click on Manage Configurations. and duplicate existing Debug and Release configurations. Rename new condigurations to Debug64 and Release64. 


Since those two new configurations will be defined for x64 architecture, we will use the MinGW-W64 tools. For both new configurations, in Build node set Tool Collection to MinGW-W64 and set individuality the Architecture option in C++ Compiler to 64 Bits.


Now, you should be able to build and run the Debug, Release or Debug64, Release64 with no additional changes and get this output


Now locate the created applications in <ProjectName>/dist folder an try to run them. There should not be problem to run 32 bit versions, but if you try to run 64 bit versions, an error occurs.


Return back to NetBeans IDE and in Build/C++ in Compilation Line section add Additional Options

-static-libgcc -static-libstdc++

to all configurations. Now rebuild under all configurations. Since the code does not contain command to wait for input, the console window closes instantly. It is better to test application in command prompt, you can invoke it by holding Shift + right click on folder containing the application. If everything set and running, you can close the NetBeans IDE for now.

Setting the SDL2

The first thing you need to do is to download the SDL library. I have used the SDL2-2.0.3 version. Libraries are available on project official page:


Download and extract the file where you can find it. I have extracted the contents of the archive into C:\Devel\SDL2-2.0.3 folder. 

32-bit application

Go to folder, where you extracted the SDL2-2.0.3 files and look for folder i686-w64-mingw32. Open the include folder and copy whole folder SDL to MinGW include directory, in my case to C:\Code\mingw\include\. Next, open the lib folder in i686-w64-mingw32 directory and copy two files libSDL2.dll.alibSDL2main.a into MinGW lib directory, in my case to C:\Code\mingw\lib\.

64-bit application

Go to folder, where you extracted the SDL2-2.0.3 files and look for folder x86_64-w64-mingw32. Open the include folder and copy whole folder SDL to MinGW-W64 include directory, in my case to C:\Code\mingw64\x86_64-w64-mingw32\include\. Next, open the lib folder in x86_64-w64-mingw32 directory and copy two files libSDL2.dll.alibSDL2main.a into MinGW-W64 lib directory, in my case to C:\Code\mingw64\x86_64-w64-mingw32\lib\.


Configuring the NetBeans IDE and C++ project

Important - close the NetBeans if you have it running. It will reload includes and libraries in paths that you just added. Run the NetBeans IDE and open Hello world project. Copy following code to main.cpp:


The code contains only main function with basic SDL2 initialization and white 800x600px window centered on screen with white background. After 3 seconds, the window automatically closes. Open the project Properties and you need to go to Build/Linker and set the Additional Options to

-lmingw32 -lSDL2main -lSDL2

in this order. Now you should be able to compile project in all configurations. But to run the application, you need to copy correct SDL2.dll to folder where the application will run.

  • In 32 bit application case, I copied the SDL2.lib from SDL2-2.0.3\i686-w64-mingw32\bin to the project output path for Debug and Release
  • In 64 bit application case, I copied the SDL2.lib from SDL2-2.0.3\x86_64-w64-mingw32\bin to the project output path for Debug64 and Release64.

Now you can compile the project and the result should be looking like this:


with console window behind it. From now on, you can edit the code as you wish. I recommend tutorials on  Lazy Foo' Productions tutorials or browse web.


Possible mistakes and errors

  • Do not mix 32/64 bit architectures. It is painful to locate this errors. 
  • If the #include <SDL2/SDL.h> is underlined, you probably made a mistake when copying files from include or lib from SDL to MinGW folder. Copy folder, not only files in it. 
  • If compiler throws error: undefined reference to `WinMain@16' , you probably forgot to add the -mingw32 option to linker.
  • If you try to compile the code, and get error: winapifamily.h: No such file or directory in SDL_platform.h, you probably have to replace the file located in  mingw/include/SDL2/SDL_platform.h by file SDL_platform.h.
  • If compile is successful, but the application throws the Fatal Error: Out of memory - aborting message, you probably forgot to copy the SDL2.dll library or used wrong version. Replacing with x86 version should resolve the problem.

Additional notes

To run window without console, add additional 

-mwindows -luser32 -lgdi32 -lwinmm -ldxguid 

options to linker. When you run the application in folder, the console window won't appear. If you notice an mistake or missing of important step, or this post helped you in your project, please let me know. Thanks!